
Energy Conversions

Author(s):
Summary:
‘F.8.7.3. 2. “It designs a model based on the conversion of electrical energy into heat, light or motion energy” .
With this achievement, the aim of this lesson plan is to experience using energy in various fields by producing energy from heat, light or motion.
| Lesson plan summary | |
| Subject | Green Chemistry / Green Biotechnology / Green Engineering and Robotics |
| Topic | Energy conversions |
| Age of students | Secondary 10-14 |
| Preparation time | 15 Minutes |
| Teaching time | 2*40 Minutes |
| Online teaching material (links for online material) | |
| Offline teaching material |
Aim of the lesson
By the end of this lesson students will:
1)design a model based on the conversion of electricity into heat, light and motion energy.
2) Enrich the consciousness of nature by providing energy from various sources.
3) Acquire knowledge and understanding about the interactions between science-technology-society and the environment.
· Trends
STE(A)M Learning /expository teaching method / project-based learning
Activities
Describe here in detail all the activities during the lesson and the time they require. Remember, that your lesson plan needs to revolve around the topic of green engineering and robotics.
| Name of activity | Procedure | Time |
| Engage-1 | After the teacher asks the students how they are, they show various visuals to reveal their ideas in order to determine their readiness on the subject.    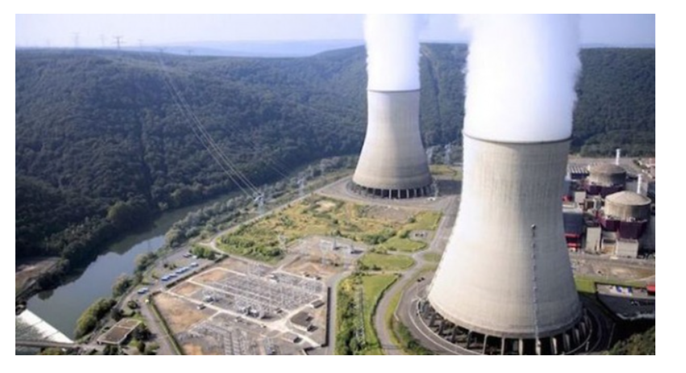 | x min |
| Explore-1 | With the visuals shown in the attention-drawing stage, the students will reveal what they know about energy sources and conversions. Then, the instructor shows the materials in his hand and asks the question, “How do you think you can set up and produce energy with these materials?” And ask them to draw their ideas using their imagination and existing knowledge. | x min |
| Explain-1 | The materials to be used and the coding system are presented to the students by the instructor at this stage. Material List to be used:1. Arduino Robotic Coding Board2.1x 24V DC Motor3.1 Pcs Led Bulb4.1 Pieces Propeller5. Jumper Cable6. Mblock IDE Program 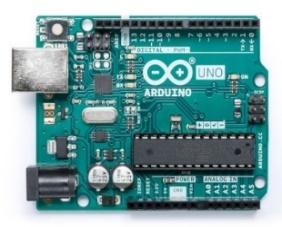 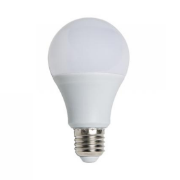 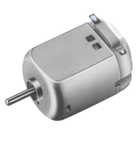 Arduino Uno 2. 24V DC Motor 3. Led bulb    4. propeller 5. Jumper cable 6. Mblock Ide 4. propeller 5. Jumper cable 6. Mblock Ide The Data Obtained: With the above materials, an experimental setup will be installed, on the one hand, with a wind with kinetic energy, and on the other, with a DC motor that will generate electricity. With the kinetic energy of the wind, the propeller of the DC motor will rotate. Thus, an energy conversion will be provided by generating electricity from the air stream. The data collected as a result of the experiment will be Voltage (V). Expectation:Energies in nature exist in different forms. We can use this energy for our needs and nature by transforming energy types into each other. Thanks to the air flow in nature, the propeller connected to the DC motor is expected to turn and generate electricity. In this way, the led bulb will be burned. The electricity produced will be measured by the Arduino programming card. | V |
| Elaborate-1 | Conversion of Heat Energy to Light Energy and Measuring the Voltage Goal:In this project in which different energy types will be examined, the transformation of energy types in nature will be examined. This experiment is a prototype and it will be observed how the energy obtained from a renewable energy source helps to facilitate our daily life. Design of Experiment Setup:In this project, Wind Powerhouse that generate electricity from wind in nature will be modeled. By using a propeller at the end of a powerful engine, the engine will be used in reverse logic, that is, as an alternator. To create a strong wind, it will be blown into the propeller and voltage will be generated at the electrical output ends of the DC motor. The voltage generated will be measured by connecting the electrical output ends of the DC motor to the Arduino. Design of the Experiment: The experimental setup we have designed above will be designed.● The wind that comes at high speed towards the propeller will turn the propellers with the logic in the wind turbines installed in the nature, that is, it will turn into motion energy.● With the rotation of the impeller connected to the DC motor end, electricity will be generated in the DC motor. Thus, motion energy will be transformed into Electric Energy.● The generated electricity will be connected to the analog terminals of Arduino to measure the voltage and will be transformed into light by sending it to a led bulb. Necessary materials: 1 x Arduino Uno Robotic Coding Board1 x Breadboard1 x 5V DC Motor1 x Propeller1 x Led Bulb5 x Jumper cables Introduction of DC Motor and Pin Connections: DC motors are worm gear systems. They have the speed depending on the rate of voltage given to their pins and rotate as long as the voltage is applied. There are 2 pin outputs, these are Vcc, GND. They supply voltage from the electrical ends in direct proportion to the rotational speed of the pin. When it is connected to Arduino’s Analog input, it takes 0 – 1024 value depending on the rotational speed of it. Functions of pin outputs: Vcc: the pin which is connected to Arduino’s Analog input terminals GND: the pin which is connected to Arduino’s GND terminals Negative voltage is obtained if motor is reversed.  Making Circuit Connections: 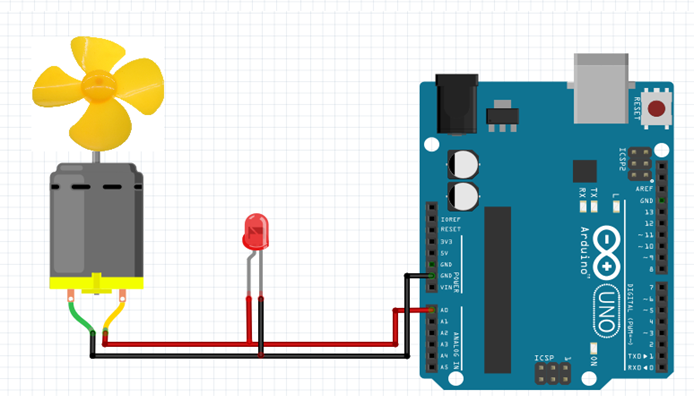 First of all, as mentioned above, a DC motor will be taken and a propeller will be attached to its pin. Circuit connection will be made as above. 1. One end of the DC motor will be connected to the GND end of Arduino, and the same end will be connected to the Chassis end of the Led Bulb.2. The other end of the DC motor will be connected to the A0 Analog end of Arduino; the same end will be connected to the other end of the Led Bulb. Coding: The application we will use for coding is the Mblock program. This application is a tool that allows us to do robotic coding by dragging and dropping blocks without the need for programming language knowledge. Coding block is below.  If we explain the application steps one by one: Read analog pin (A0) Block:Indicates that data from the A0 Analog pin of Arduino is read. ( ) ile ( ) combine block: This block combines two values in parentheses. Here it will be combined “Generated Voltage” and value read in A0 Analog pin of the Arduino. Serial Write Text ( ) block: This block allows to be sent the variable that comes in parentheses to the the serial port so the computer via USB cable. ( ) ile ( ) combine and Serial Write Text block: It combines what is written in parentheses and sends this value to the Serial port, that is, to the computer. Here, in parenthesis, it will combine “Generated Voltage” and value read in A0 Analog pin of the Arduino and write it to the Serial port, that is, send it to the computer. Wait ( ) secs block: Arduino Robotic Coding board will wait without doing anything for the given seconds when it sees this block . In our experiment here, we need to get data every 0.1 seconds so 0.1 value is entered into our waiting block.  ( ) < ( ) compare block: ( ) < ( ) compare block:This block compares the magnitude of the two values given in parentheses. If the value in the first parenthesis is greater than from the second it gives “True” or 1, if it’s not greater, it gives “False” or 0.  In this project, it was compared that whether the value read in the Arduino’s Analog A0 pin that is, taken from the photoresist is less than 250. This block provides sending the value “False” or ‘0’ from Arduino to the pin number given in parentheses. It provides sending commands to SIGNAL pin of Relay from pin 2 of Arduino so Led Bulb circuit is turned off and the LED is lit. Set digital pin () output as “low“ block This block provides sending the value “true” or ‘1’ from Arduino to the pin number given in parentheses. It provides sending commands to SIGNAL pin of Relay from pin 2 of Arduino so Led Bulb circuit is turned on and the LED doesn’t light. If () then block: With this block, if the condition next to the run is met, it runs the code blocks in the first range, if it cannot be provided, it allows to run the other range.  Forever Block In our experiment here, we need to get data every 0.1 seconds so 0.1 value is entered into our waiting block. It provides repetition continuously. So, the generated voltage which is read from DC motor send to the computer through the serial port and wait for 1 sec. This process will be done continuously unless Arduino is closed. Arduino Program block:this block represents energizing the Arduino Robotic Coding device. When it is energized and starts working, it means that code blocks added as a chain to it.● As a chain to the block “When Arduino Uno starts”, “repeat block” is added so it will be entered in this block first.● First of all, data from A0 Analog pin of Arduino will be read inside the repeat block.Generated Voltage:” text will be combined with the incoming data.● The combined text will be sent to the computer via the serial port.● The Arduino Robotic Control Board will wait 0.1 seconds.● The processes we described above would be repeated continuously until Arduino was closed. TOPIC SUMMARYConversion of Electric Energy to Heat Energy This conversion of electrical energy is used in technological applications. Some examples are given to applications which electrical energy is converted into heat energy.Many tools are used to convert electrical energy into heat energy. Water heaters, ovens, air conditioners, grills, electric water heaters and stoves are some of them. Transformation of Electric Energy into Light Energy On a dark road, you use a flashlight to illuminate your path and a lamp to illuminate your room. When you turn on the TV in a dark room, you will notice that the room is a little illuminated. Because the devices convert electrical energy into light energy. One of the tools that convert electrical energy into light energy is the light bulb. There is a wire inside the light bulb and this wire lives when electric current passes and radiates light. Thus, electrical energy turns into light energy. In the event, the current passing through the steel wire at the end of the plug enabled the wire to light around. Traffic lights, illuminated signs or computer screen are examples of technological applications based on the conversion of electrical energy into light energy.Transformation of Electric Energy to Motion Energy Tools such as mixer, drill and chopper work with the conversion of electrical energy into motion energy. The engines in these vehicles convert electrical energy into motion energy. There are magnets inside the motors. When current flows through the motor, interaction with magnets occurs and the motor moves. Generation of Electric Energy Water left from the high in hydroelectric power station activates the paddles of the turbine. This movement is transferred to the generator. A magnet rotates inside a metal spool, just like on a bicycle dynamo. Meanwhile, electrical energy is generated from the mechanical energy generated by the rotation of the wave, by activating the electrons in the reel.In wind power stations, turbines rotate under the influence of wind. As a result of this movement, electrical energy is produced. In geothermal power stations, high pressure steam is obtained with the thermal waters extracted from underground. The steam sprayed on the steam turbines causes the turbine to turn and generates electricity.One of the power stations developed to meet the increasing energy need is nuclear power station. In nuclear power stations, steam is produced with the energy obtained from nuclear fuels. This steam generates electrical energy by rotating the generator turbines.Nuclear power stations are an important resource for generating energy. It is possible to produce more energy in nuclear power stations without polluting the environment. However, security measures should be taken at the highest level when using nuclear power stations. We also find news about the warming of the Earth in television, newspapers and magazines. According to scientists, all these are related to each other, and the warming of the Earth is due to the release of large amounts of carbon dioxide into the air, depending on the energy sources we use. For this reason, it is necessary to use power stations that can generate the most energy with the least damage to the nature. Today, all countries are trying to find solutions to these problems. Now everyone agrees on the introduction of clean energy sources. After the activity, the students are informed about the subject with expository teaching method by the instructor. Instructor also mentioned the damages of the type of fuel used to nature. It points out that it would be more environmentally friendly to use less renewable energy or use renewable energy sources instead of using this fuel. As a result of these information, students correct their mistakes, if any, in their answers. | 25+25 min |
| 5. Evaluation | Materials Used: Connection cables, scissors, electric insulting tape, piezoelectric disc, cuttable resistance, fleece, cushion, fleece wrap, rope, needle, glue, utility knife, mini rocking chairMaterials that are not mandatory to use: You can use 5 different materials you want.NOTE: Piezoelectric is the electricity generated by applying a mechanical force on some materials. It was first discovered in 1880 by Pierre Curie and Jacques Curie. Piezoelectric effect is a reversible effect. In other words, when force is applied to a material with a piezoelectric property, a mechanical movement occurs.Knowledge Based Life Problem Uncle Halil has a garden that is illuminated and blossomed. He drinks tea and listens to music in his garden every evening. Uncle Halil enjoys his garden by swinging in his rocking chair. But since Uncle Halil was an old man, he started to get very cold in his garden with the arrival of autumn. His feet are very cold especially because he has diabetes. And with the cooling of the air, he becomes constantly sick. 1- Can you design a heating system for Uncle Halil’s rocking chair?2- When you consider the working principle of the product you designed; which fields can this principle be used in our daily life? Limitations:– You should draw the design you dreamed of on A4 paper.- Protractor must be used while drawing. (Cut-out cable resistances should be placed at an angle of 60 degrees to each other.)- At least one of the fleece shawls and cushion should be used.- You must have a product file describing the researches you have made and your product design steps while creating your product.- You must deliver your project within 3 days. Evaluation of the Product Created: Points 1-Gathering information and data using different sources of information (10 points) 2-Putting the information together (10 points) 3-Using time well (15 points) 4-Creativity / Innovation (15 points) 5-Relevance and association of the resulting product with the subject (20 points) 6-Problem solving skill (15 points) 7-Was the problem solved associated with everyday life? (15 points) | 15 min |
| X min |
Assessment
Describe here the assessment method of the lesson, if any. For example, if you plan on assessing your students with a quiz, include here questions and answer options with color-coding the correct answers.