
Frictional force
Author(s):
Summary:
‘F.5.3.2. The aim of this lesson plan is to experience the friction force on different floors will be different by using the specific stages of coding based on the learning outcome that is “application of friction force on slippery and rough floors, the applications of friction force in daily life
| Subject | Green Engineering and Robotics |
| Topic | Applications of friction force on slippery and rough floors |
| Age of students | Secondary 10-11 |
| Preparation time | 15 Minutes |
| Teaching time | 2*40 Minutes |
| Online teaching material (links for online material) | |
| Offline teaching material |
Aim of the lesson
By the end of this lesson students will:
· realize that the friction force varies depending on the floor.
. experience that the friction force causes a decrease in the energy of motion.
. be aware of the place and importance of friction force in our daily life.
. reveal their own ideas about friction force and thus gain creative and innovative thinking skills.
Activities
Describe here in detail all the activities during the lesson and the time they require. Remember, that your lesson plan needs to revolve around the topic of green engineering and robotics.
| Name of activity | Procedure | Time |
| Engage-1 | The teacher greets the students and asks how are they. Then the students are divided into groups. A remarkable story about friction force and energy is distributed to each group. (Activity 1 Aylin’s Snow Adventure) Aylin and her family were on their way to Erzurum where their grandfather lived, for the semester holiday. As it got closer to Erzurum, the air cooled down and snow was covered everywhere. When Aylin looked out the window of the car, she saw that some cars stopped and some cars slid and crashed. Realizing the situation, his father, Ahmet thought that he had to put a chain on the tires and went out of the car and headed to the baggage. But he saw that there was no chain. Concerning this, as Ahmet hurried to find a chain from the environment, slipped and fell on the ground. Ahmet complained that “I wish I had worn my snow shoes instead of flat shoes.”. Fortunately, the people around them brought chain for their car and they continued the journey by putting the chain on the tires. Aylin watched all these things with curiosity and thought about them along the way.What do you think about why Ahmet fell on the ground?What do you think about why Ahmet put the chain on the tires? Making the Activity: A student is asked to read this story aloud. At the end of the story, answers are received from each group for questions. Students are asked what examples they can give on this topic from their daily lives. | 5 min |
| Explore-1 | An activity is given to students to observe that the friction force varies depending on the type of friction floor and causes a decrease in their speed. Topic: Friction Force Experiment Name: Why did the speed decrease?Purpose: Tools and Equipment:- Cardboard- Toy car-Different types of floors (sandpaper, aluminum foil)-Various books-Ruler How shall we try? 1. Students are asked to create an inclined plane.2. Students are put on a hypothesis about which floors the car will go further by putting different floors under the inclined plane. Hypothesis…………………………………. 3.Students release cars from the top of the inclined plane and write their observations.4. They measure how long the car travels on different floors with a ruler and record the measurements in the table. Set upType of floorTaken road (cm)Set up Set up What conclusion have we reached? 1. On which ground did the car go further?Since the energy would not get lost, wouldn’t cars have to go on forever? What is the force that stops cars?3. What is the reason why the car moving on the aluminum foiled floor goes further than the car moving on the sandpaper floor? Hypothesis, measurement results and answers to the questions are taken from each group. Students’ answers are discussed and brainstorming is created. | X min |
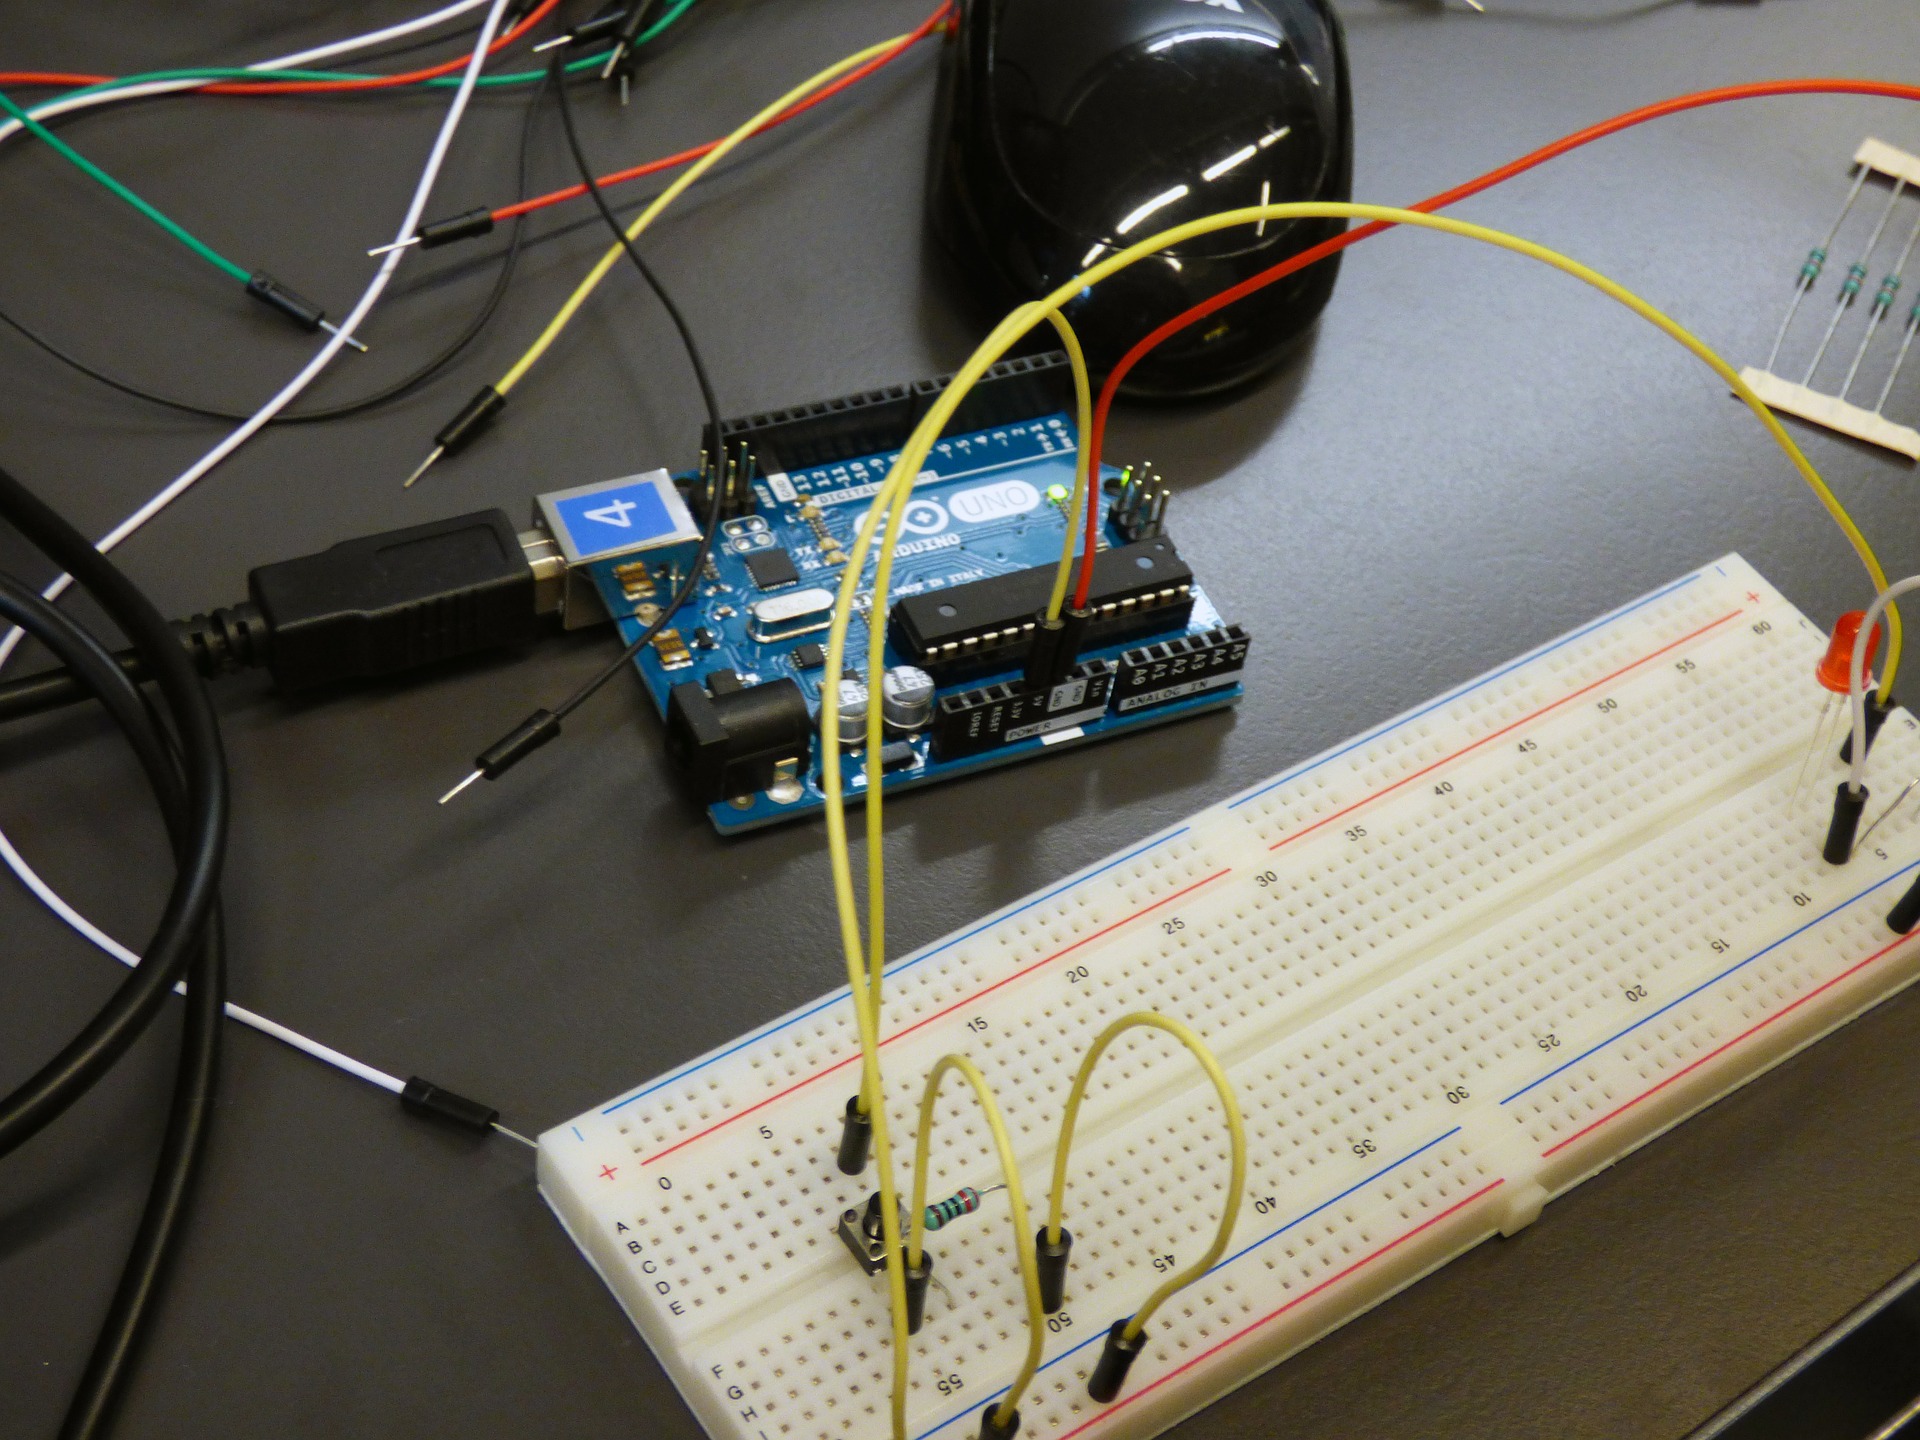
| Explain-1 | At this stage, it is aimed to make the students integrate the activity with coding.Effect of Floor on Friction Material List to be used:1. Arduino Robotic Coding Board2.2 Pieces 3V-6V DC Motor3. 1 Push Button4.2 Pieces HC-SR04 Ultrasonic Distance Sensor5. 2 Wooden Blocks6. 1 Piece of Marble Floor7. 1 Sanding Floor8. 2 pieces of 1meter rope9. Jumper Cable10. 1 Piece 10k Resistor11. Mblock IDE Program 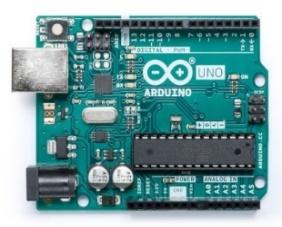 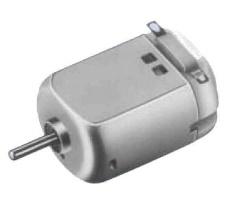 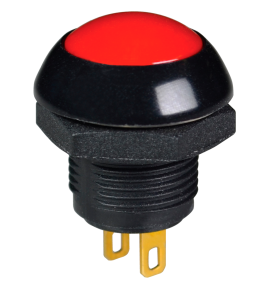 Arduino Uno 2. 3V-6V DCMotor 3. Push button 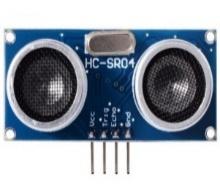 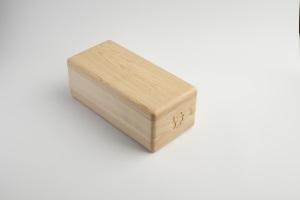  4. HC-SR04 5. Wooden block 6. 1 Piece of Marble floor    7. 1 Sanding Floor 8. Two pieces of one meter rope 9. Jumper cable 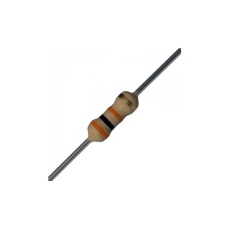  10. 10k Resistor 11. Mblock IDE The Data Obtained:With the above materials, two mechanisms will be installed in one environment with a marble floor and in another environment with a sanding floor. In different friction environments, the timing of the wooden blocks to reach the distance sensor will be measured. Ultrasonic distance sensor and Arduino Uno board timer code will be used to measure arrival times. The data to be collected as a result of the experiment will be time.Expectation:The friction coefficients on different floor types will be different. Rough floors have higher friction than flat floors. The movement of objects will be slower as the friction resistance increases. Since the friction is less on the marble floor, the wooden block in this environment is expected to complete the track more quickly. The wooden block will stop when it comes in front of the distance sensor and the time to this point will be measured with Arduino. | x min |
| Elaborate-1 | Measuring the Effect of Friction Force of floor on the Motion of Objects Goal:This experiment is designed to examine and measure the effect of different floors on the friction force of objects. For this purpose, the effect of the friction forces of different floors on the object will be examined by pulling two identical objects with equal force on different floors that have different friction coefficients. Design of Experiment Setup:Two experimental setups will be prepared for this experiment. 1. setup: 1 meter long flat marble will be placed on horizontal ground. A distance sensor will be placed at one end of this marble. This test environment will be a marble friction test environment for us. 2.setup: 1 meter long flat sandpaper will be placed on horizontal ground. A distance sensor will be placed at one end of this sander. This test environment will be a sanding friction test environment for us. Two identical wooden blocks are required for the experiment and two 1-meter ropes are required to pull these blocks by the DC motor. DC motors will be placed on one end of the floor and wooden blocks on the other.One end of this one-meter rope will be attached to the wooden block in the marble floor and the other end to the pin of the DC motor in the marble floor.One end of another 1 meter rope will be attached to the wood block in the sanding floor and the other end to the pin of the DC motor in the sanding environment.HC-SR04 distance sensors must be placed in front of DC motors, in a position to detect wooden blocks from a distance of 3cm.Finally, a button that will start the DC motors and start the timer counter will be used to start the experiment. The setting of the Experiment:In the experiment setup, DC motors will be operated at the same time by pressing the button and it will be ensured that they pull the wooden blocks.At the same time, pressing the button will start the counting process on the Arduino Robotic card.1. There will be a DC motor at one end of the marble test environment and a wooden block attached to this DC motor at the other end. The HC-SR04 Distance sensor will be located in front of the DC motor.When the start button is pressed, the counter will start counting.At the same time, the engine on the marble floor will start pulling the wooden block on the marble floor with a voltage of 2 V.The DC motor will continue to pull until the distance between the wooden block and the distance sensor remains 3 cm. When the distance of 3 cm remains, the distance sensor will warn and stop the motors.At the same time, the timer will calculate the time so that the timing of the wooden block on the marble floor will be determined. 2. There will be a DC motor at one end of the sanding test environment and a wooden block attached to this DC motor at the other end. The HC-SR04 Distance sensor will be located in front of the DC motor.When the start button is pressed, the counter will start counting.At the same time, the engine on the sanding floor will start pulling the wooden block on the sanding floor with a voltage of 2 V.The DC motor will continue to pull until the distance between the wooden block and the distance sensor remains 3 cm. When the distance of 3 cm remains, the distance sensor will warn and stop the motors.At the same time, the timer will also count the time so that the timing of the wooden block on the sanding floor will be determined. Our aim in the design of this experiment; to show that the effect of the friction force on different floors will be different and the motion of the moving object will be affected. Our expectation here is that the wood block moving on the marble will be drawn faster since the friction force of the sanding floor will be higher. Necessary materials:1 x Arduino Uno Robotic Coding Board1 x Breadboard2 x 5V DC Motor2 x HC-SR04 Distance Sensor1 x Push Button2 x 1meter rope1 x 10k resistor2 x Wooden Block Introduction of DC Motor and Pin Connections: DC motors are worm gear systems. They have the speed depending on the rate of voltage given to their pins and rotate as long as the voltage is applied. There are 2 pin outputs, these are Vcc, GND. They have the same speed with the voltage value given from the Vcc pin. Voltage from 0 to 5 V can be applied to the DC motor by giving 0-255 value from Arduino’s PWM generating pins. To define the functions of pin outputs: 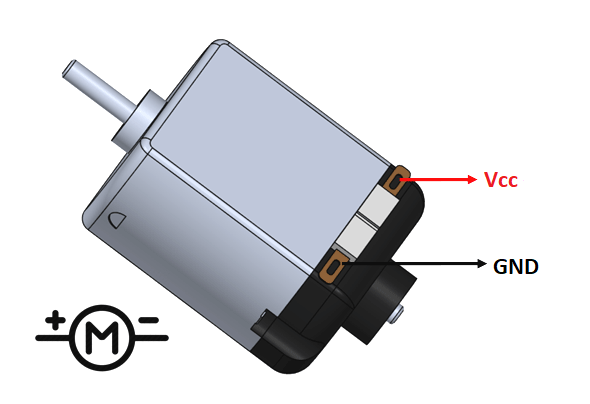 Vcc: Required for the operation of the devicepin to which the voltage is given GND: pin required for the completing the electrical circuit The connection must be reversed to reverse the motor 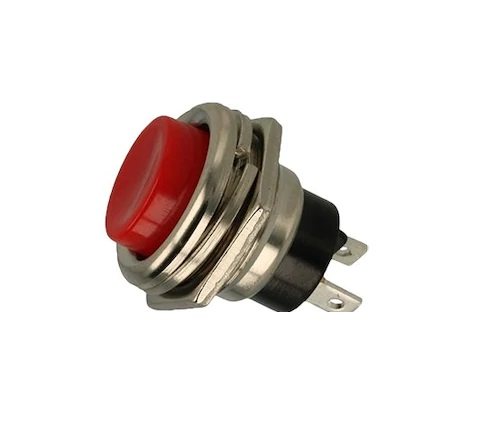 Introduction of Buttons and Pin Connections:Buttons are used to open or close a circuit in electrical and electronic systems. They are connected in series to a system. Energy flow is provided by pressing the button, so energy goes into the system and the system starts working. The electrical circuit cannot be completed when the button is not pressed, so no energy flow can be provided, so it doesn’t work because there isn’t energy to the system. The purpose of use here is to transmit the energy connected to one pin to the other pin when pressed. It will not be able to transmit when it is not pressed.  HC-SR04 Distance Sensor and Pin Connections IntroductionThe HC-SR04 Distance sensor is a sonar-style distance measuring device. It has a system that measures the distance of the opposite object by taking the sound waves it sends from one eye to the opposite object and taking it from the other eye. It can measure distances between 2cm and 400cm.To define the functions of pin outputs: Vcc: Required for the operation of the devicepin to which the voltage is given GND: pin required for the completing the electrical circuit Trig: Sensor Triggered Pin Echo: Pin which takes the data from the sensor Making Circuit Connections:  Firstly, as mentioned above, two experiment set-ups, one is from marble and the other is from sandpaper, will be prepared. After making the preparations for setting the above experiment: 1. The Vcc pin of the DC motor in the set-up prepared for the sanding floor will be connected to the number 9 pin of Arduino and the GND pin of the DC motor to the GND Pin of Arduino.2. The Vcc pin of the DC motor in the set-up prepared for the marble floor will be connected to the number 10 pin of Arduino and the GND pin of the DC motor will be connected to the GND Pin of Arduino.3. Connections of HC-SR04 Distance sensor prepared for the sanding floor will be made as given below. HC-SR04 Pins Arduino Pins Vcc Vcc GND GND Trig D3 Echo D44. Connections of HC-SR04 Distance sensor prepared for marble floor will be made as given below. HC-SR04 Pins Arduino Pins Vcc Vcc GND GND Trig D5 Echo D6 5. A button will be used to operate this circuit. When this button is pressed, DC motors will start and draw wooden blocks. Also, pressing the button will start counting from 0. One end of the button will be connected to the Vcc pin and the other end to the digital pin 2 of Arduino. Here, a 10-kohm pull-down resistor is used to prevent instability. One end of the pull-down resistor will be connected to the end of the button that goes to Arduino and the other end to the GND pin of Arduino. Coding: 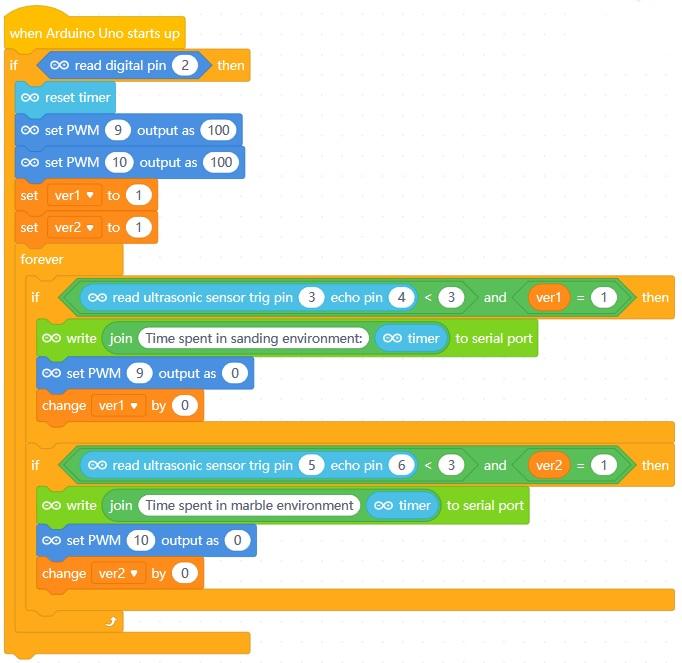 The application we will use for coding is the Mblock program. This application is a tool that allows us to do robotic coding by dragging and dropping blocks without the need for programming language knowledge. Coding block is on the side. If we explain the application steps one by one: Two variables will be created which we have to use in this project before moving to coding blocks. “Data1” and “data2” variables will be created by coming to the Variables menu of the Mblock IDE and clicking on the “Create a Variable” tab. Digital Pin Reading () block: Indicates that data from the given Digital pin of Arduino () in parentheses are read. Data from digital pins can only be 0 or 1. In this project, data from digital pin 2 is read. If () then block: If the expression that comes in parentheses with this block of code is logically “True”, all blocks placed in the block work. If it is logically “False”, this and the code blocks in it are passed without running. 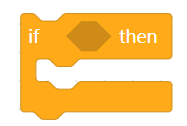 Timer Reset block: It is stated that with this code block, a time counter starting from 0 is started in Arduino. Set PWM () output () block:This code block is used to output PWM signals to the digital pins that can output PWM of the arduino. In this project, a voltage of 100 PWM, that is 2 V voltage, was applied to the DC motor connected to pin 9 of Arduino and to the DC motor connected to pin 10 again. Create data1 () block: Allows the value in parenthesis to be assigned to the data1 variable we created earlier. Here, 1 is assigned to the variable data1. Create data2 () block: Allows the value in parenthesis to be assigned to the data2 variable we created earlier. Here, 1 is assigned to the variable data2. 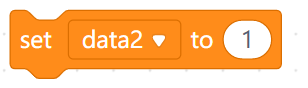 ( ) with ( ) comparison block: This block compares two values given in parentheses. Returns “True” or 1 if it is the same, or “False” or 0 if it is not the same. Here, our data1 value and 1 value were compared. Here, our data2 value and 1 value were compared. () <() comparison block: This block compares the magnitude of the two values given in parentheses. Returns “True” or 1″False” if the value in the first parenthesis is greater than the second. Returns “false” or 0 if the value in the first paranthesis is not greater than the second one. ın this project, it is compared whether the distance taken from the sanding floor is less than 3. ın this project, it is compared whether the distance taken from the marble floor is less than 3. Distance Sensor () Trigger Pin () Reading Pin block:This code block represents data reading from the HC-SR04 Distance sensor. In the distance sensor, the pin number of the Trig pin connected to Arduino will be entered in the Trigger pin parenthesis, and the pin number of the Echo pin connected to Arduino will be entered in the Reading pin parenthesis. In this project, 3 Trigger Pins and 4 Reading Pins are used for the Distance sensor prepared for the sanding medium. In this project, 5 Trigger Pins and 6 Reading Pins are used for the Distance sensor prepared for the marble environment. ( ) and ( ) block:In this block, two values in parentheses are compared with the AND logical operator. The results are obtained according to the logical state of the two values.  In our project,the condition is provided if the distance value taken from the distance sensor connected to the digital pin 3 and 4 of Arduino for the sanding medium is less than 3 AND the content of the data1 variable is 1. In our project, the condition is provided if the distance value taken from the distance sensor connected to the digital pin 5 and 6 of Arduino is less than 3 AND the content of the data2 variable is 1. In our project, if the value read from the digital pin 4 of Arduino is 1 and the content of the data1 variable is 1, then the condition is provided.  ( ) with ( ) jointing block: This block combines two values in parentheses. Here, the time from the timer will combine with the “time spent in the sanding environment”. Here, the time from the timer will combine with the “time spent in a marble environment”. Write ( ) to serial port block: Allows the serial port of the variable that comes in parentheses is sent to the computer via USB cables.  Combine () with () and Write to Serial Port block:It combines what is written in parentheses and sends this value to the Serial port, to the computer. Here, in parenthesis, it will combine the “Time in Sanding environment” with the value from the timer and write to the serial port that sends it to the computer. Here, in parenthesis, it will combine the “Time in marble environment” with the value from the timer and write to the serial port that sends it to the computer. Change “ver” by ( ) block: It means that the content of the variable defined by us is replaced with the value written in parentheses. In the project here, the content of the data1 variable is replaced with 0 In the project here, the content of the data2 variable has been replaced with 0. forever block: As long as Arduino is open, it provides continuous repetition of the blocks placed in it. This process will be done continuously unless Arduino is closed.  The block when Arduino Uno starts: This block represents energizing the Arduino Robotic Coding device. It means that code blocks added as a chain will be executed when energized and started to run. Since the “if () block” is added as a chain to the “When Arduino Uno starts” block, the condition inside the if block is queried first. The condition here is that the value of “Digital Pin reading (2)” is 1. This means that the button connected to the digital pin number 2 of Arduino is pressed.After pressing the button connected to pin 2, the code block chains under it start working. The first block of code is “Reset Timer”. This code block enables Arduino to start a timer in it.The next code chain is “PWM set (9) output (100)”. This code block shows that the value of 100 is sent as PWM to the DC motor connected to Arduino’s digital pin 9. The next block of code is “Set PWM (10) output (100)”. This code block shows that the value of 100 is sent as PWM to the DC motor connected to the digital pin 10 of Arduino.The PWM value ranges from 0 to 255. PWM 0 indicates 0 volts and 255 indicates 5 volts. In this way, the values of PWM can be calculated by making the direct proportion. The 100 PWM value we send represents approximately 2 Volts. With the PWM voltages given to DC motors, the motors will start attracting wooden blocks in different environments.Data1 and data2 variables that we need are defined and 1 is assigned to their values.Then, “repeat continuously” is entered into our repeat block and the blocks in here are repeated continuously. the if () the block () is in the continuous repetition occurs if the distance measured by the distance sensor placed on the ground is less than 3 and the value of the data1 variable should be 1 When this condition is met, the codes inside the code block will work. If not, it continues from the code below the block of code. When the reading of the distance sensor is less than 3, that is, the distance of the wooden block to the distance sensor is less than 3 cm, the codes inside will work. These codes mean the time to complete the distance of the environment whichever block is entered.Then the PWM value of the DC motor in that environment is set to 0, wherever the distance sensor showed the distance under 3 cm.The content of the latest data variable is set to 0.Thus, the time for taking the distance of the wooden block for both environments will be found.With a simple calculation, Speed (V) = Path (X) / Time (t) and average speed are found.  After the activities, detailed information about the subject is conveyed to the students by the teacher.With force, we move, accelerate or slow objects. In some cases, force prevents or complicates movement of objects. This force results from the property of the object itself or the property of the surface it touches. The rough surface makes it difficult for objects to move, while the less rough surfaces facilitate the movement. For example; While it is easy to slide on an icy ground (less rough), it is much more difficult to slip on an earthy ground (rough). The force that occurs between objects and the surface they touch, which makes or hinders the movement of the object and acts in the opposite direction to the movement direction of the object, is called friction force. Objects moving on rough surfaces stop after a while. The reason for this is the friction force between the object and the surface. It is a result of the friction force that a ball moving on the football field slows down after a while and the swinging swing slows down after a while. | X min |
| 5. Evaluation | Diagnostic Branched Tree is distributed for the purpose of evaluation. In this activity, students are asked to find the appropriate output. 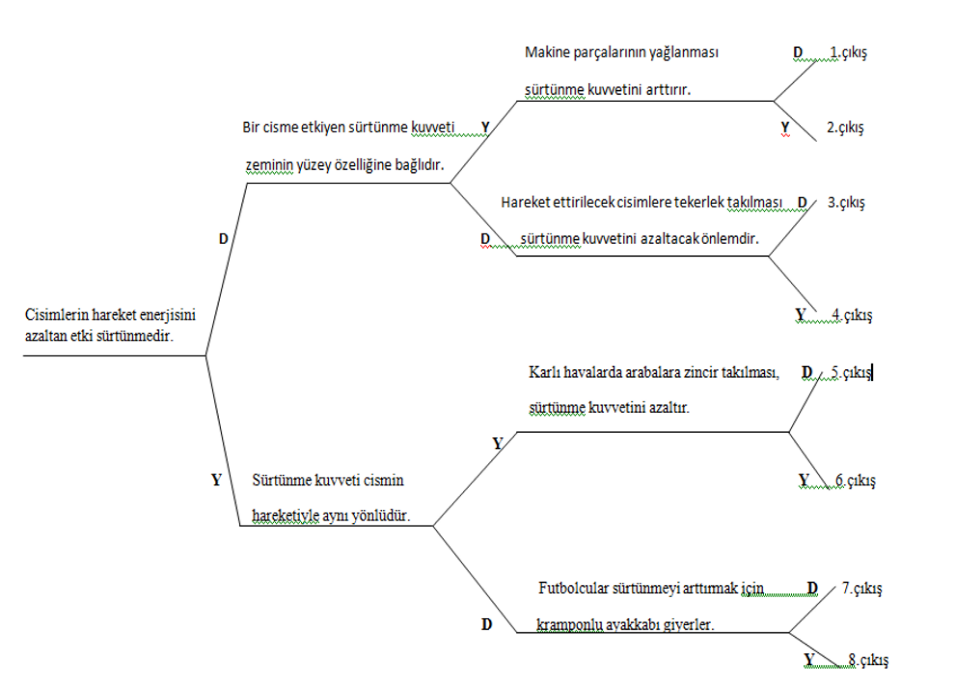 | x min |
| X min |
Assessment
Describe here the assessment method of the lesson, if any. For example, if you plan on assessing your students with a quiz, include here questions and answer options with color-coding the correct answers.